
05 Oct Mastering Text Addition in Procreate Pocket
Is it time to take your Procreate Pocket creations to the next level and be able to incorporate captivating text into your digital artwork? Look no further; we’ll teach you how in this tutorial.
Adding and manipulating text is a crucial skill in the world of digital artistry. This article will go over the fundamental steps of incorporating text into your Procreate Pocket projects, from inserting text to advanced techniques such as text on a path and creating eye-catching effects. By the end of this course, you will be able to transform your artistic visions into stunning, text-enhanced masterpieces, regardless of whether you’re a seasoned artist or just starting out.
Now that you’ve decided to infuse your artwork with a new dimension of creativity, we’d like to embark on a text-embellished journey together, and by the end of the process, you’ll have developed the skills needed to create your ideas into reality in Procreate
Getting Started with Text in Procreate Pocket
When venturing into the world of digital artistry with Procreate Pocket, one of the first and fundamental steps is getting acquainted with how to incorporate text seamlessly into your creations. This art form may seem daunting at first, but fear not; we’re here to guide you through the essential elements of adding text in Procreate Pocket, demystifying the process and empowering you to infuse your digital artwork with impactful words.
Opening a Canvas
First and foremost, let’s kickstart your text-embellished journey by addressing the canvas itself. Creating a new canvas or accessing an existing one in Procreate Pocket is akin to selecting the canvas you’d paint on in the physical world, only with a touch of digital magic. To begin, follow these straightforward steps:
- Tap on the “+” icon or navigate to “File” and select “New” to initiate a fresh canvas. This is your blank digital canvas, akin to a pristine sheet of paper, awaiting your creative touch.
- If you already have a canvas in progress, access it by tapping on the “Gallery” icon, where you’ll find your existing projects displayed neatly. Choose the one you wish to continue working on.
Accessing the Text Tool
Now that you have your canvas ready, let’s delve into the essential aspect of incorporating text into your masterpiece—the Text Tool. This tool is the brush for your words, the instrument that allows you to weave text seamlessly into your visual narrative.
- Locating the Text Tool within Procreate Pocket’s interface is a breeze. You’ll find it nestled among the array of tools at the top of your screen, represented by the capital letter “T.” It’s the gateway to a world of textual creativity.
- To activate the Text Tool, a simple tap is all it takes. Upon selecting it, you’ll notice a text box appear on your canvas, eagerly awaiting your input. This box is where you’ll type or paste the text you want to add to your artwork.
So, there you have it—a quick and concise introduction to getting started with text in Procreate Pocket. You’ve learned how to set up your canvas, whether it’s a blank slate or a work in progress, and how to access the Text Tool, the portal to text-based creativity. With these foundational steps in your arsenal, you’re now ready to embark on your artistic journey, adding meaningful text that enhances your digital creations in Procreate Pocket. Whether you’re crafting digital illustrations, designing posters, or exploring the limitless possibilities of text and visual artistry, remember that your canvas is your canvas, and your words are the strokes that bring it to life. Happy creating!
Adding Basic Text
In the intricate realm of digital artistry, the ability to add basic text in Procreate Pocket is akin to wielding a fine-tipped brush on a canvas—it’s the essence of precision and creativity. Let’s embark on a journey to unravel the essential techniques that will empower you to seamlessly infuse your digital creations with text that captivates and communicates.
Creating a New Text Layer
Creating a new text layer is the cornerstone of text manipulation in Procreate Pocket. It’s the virtual equivalent of preparing a fresh canvas for your artistic endeavors. Here’s how to navigate this crucial step:
- Begin by selecting the ‘Layers’ option from the menu, which is usually located on the top-right corner of your screen. Layers are the building blocks of your Procreate Pocket project, and they offer a flexible way to work with different elements, including text.
- Next, tap the ‘+’ icon within the Layers menu to add a new layer to your canvas. When prompted, select ‘Text’ as the type of layer you want to create. This will establish a designated layer specifically for your text, ensuring that it remains separate from your artwork, a practice that’s invaluable for editing flexibility.
- Once you’ve created your text layer, you’ll notice a text box on your canvas. This is where you can begin typing or pasting your desired text. Feel free to resize and reposition this text box as needed to fit seamlessly into your composition.
- The importance of using separate text layers for your text cannot be overstated. It allows you to edit, reposition, and apply effects to the text independently, without altering the rest of your artwork. This approach offers the utmost precision and control, ensuring that your text harmonizes flawlessly with your visual elements.
Typing Text
Now that you’ve set the stage with your text layer, let’s delve into the art of typing text and exploring the myriad options for customization:
- To input your desired text, simply tap within the text box on your canvas. This will bring up the keyboard, allowing you to type or paste your text directly. Procreate Pocket’s intuitive interface ensures a seamless typing experience, whether you’re adding captions, quotations, or artistic messages.
- Once your text is in place, the real fun begins—customization. You can easily adjust the font, size, and color of your text to align with your creative vision. Navigate to the ‘Text’ menu, where you’ll find a plethora of font options, ranging from elegant scripts to bold sans-serifs. Experiment with different fonts to find the perfect match for your artwork.
- Font size and color are equally versatile and adjustable. Use the slider to tweak the font size, ensuring that your text is legible and harmonious within your composition. For color, explore the color wheel or input specific hexadecimal values to achieve precise color matching with your artwork.
Resizing and Positioning
Resizing and positioning text is where the artistry truly comes to life. It’s the equivalent of arranging and fine-tuning elements in a physical art studio. Here’s how to execute these vital steps with finesse:
- To resize your text, select the text layer you’re working with. You’ll notice bounding boxes appear around the text box. By dragging the corners of these boxes, you can scale your text up or down, ensuring it fits seamlessly within your composition. This step is essential for achieving the desired visual balance in your artwork.
- Positioning text precisely can be achieved by selecting the text layer and then tapping and dragging the text box to the desired location on your canvas. Procreate Pocket provides helpful alignment guides that appear as you move the text, ensuring your text aligns with other elements flawlessly.
In essence, mastering the art of adding basic text in Procreate Pocket involves creating separate text layers for precise editing, typing text with finesse and customization, and skillfully resizing and positioning your text to integrate it seamlessly into your digital masterpiece. These foundational techniques provide you with the creative control needed to elevate your digital artistry to new heights. Whether you’re crafting captivating illustrations, designing eye-catching posters, or experimenting with text as a central element of your visual storytelling, these skills are your gateway to unlocking the full potential of Procreate Pocket’s text capabilities. Happy creating!
Formatting Text
In the intricate realm of digital artistry, the text’s visual presentation carries immense significance, serving as the bridge between your creative vision and your audience. Formatting text in Procreate Pocket is akin to mastering the nuances of typography in traditional art—a skill that elevates your work to new heights. Let’s delve into the art and science of text formatting, exploring the vital aspects that make your words not just readable, but visually compelling.
Font Selection
The world of fonts in Procreate Pocket is a vast and diverse landscape, offering a spectrum of typographic expressions to match your creative intent. Here’s a glimpse into the font selection process and the potential for customization:
Available Fonts: Procreate Pocket boasts an extensive library of fonts, ranging from classic serif and sans-serif styles to whimsical scripts and bold display fonts. Each font carries its own personality and conveys a distinct mood. Whether you seek elegance, playfulness, or sophistication, there’s a font to align with your artistic vision.
Custom Fonts: If the built-in selection doesn’t quite meet your needs, Procreate Pocket also offers the flexibility to install custom fonts. This opens up a world of possibilities, allowing you to integrate unique typefaces that resonate with your style. Installing custom fonts is a straightforward process—simply download the desired font files and add them to Procreate Pocket through the ‘Import’ feature. This empowers you to infuse your artwork with a personal touch and ensure your typography is as distinctive as your creativity demands.
Text Styling
Text styling is where your typography truly comes to life. It’s the equivalent of applying brush strokes in traditional painting—a method of imbuing character and depth into your words. Let’s explore the key elements of text styling:
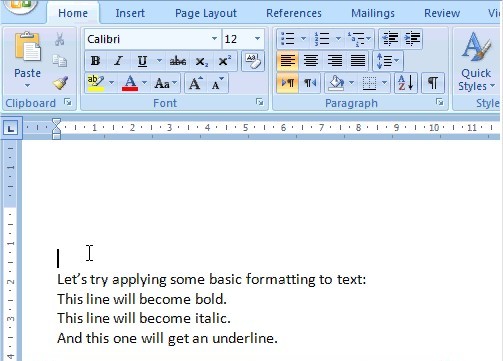
Bold, Italicize, and Underline: The ability to emphasize and highlight specific parts of your text is a fundamental aspect of text styling. Procreate Pocket provides easy-to-use formatting options that allow you to make text bold for added emphasis, italicize for a touch of elegance, or underline for clarity. These options ensure your message is conveyed with precision and impact.
Kerning and Line Spacing: Typography is not just about individual characters; it’s about how they interact. Procreate Pocket enables you to adjust kerning (the spacing between individual characters) and line spacing (the vertical space between lines of text). These controls are indispensable for achieving visual harmony and ensuring that your text flows seamlessly within your composition. Precision in kerning and line spacing can make the difference between text that feels cramped and cluttered and text that is aesthetically pleasing and easy to read.
Text Effects
To truly captivate your audience and make your text a dynamic part of your digital artwork, text effects play a pivotal role. These effects can transform your words from static elements to dynamic visual components. Let’s explore some exciting possibilities:
Shadows: Adding shadows to your text creates depth and dimension, making it pop off the canvas. Experiment with shadow direction, opacity, and blur to achieve the desired effect.
Outlines: Outlining text can make it stand out against complex backgrounds. Procreate Pocket offers customizable outline options, allowing you to choose the outline color, thickness, and even add gradient effects for a unique touch.
Gradients: Gradients bring a touch of modern sophistication to your text. They allow you to seamlessly blend multiple colors within your text, creating eye-catching visual appeal. Experiment with different gradient styles to match your artistic vision.
In essence, formatting text in Procreate Pocket is an art form that goes beyond mere words. It’s about selecting the right font to convey your message, using text styling to emphasize and harmonize, and employing text effects to breathe life into your words. These skills are the key to creating text that doesn’t just exist on your canvas but becomes an integral part of your visual storytelling. So, whether you’re designing captivating posters, crafting intricate illustrations, or conveying a powerful message through text and visuals, the world of text formatting in Procreate Pocket awaits your artistic touch. Happy creating!
Editing and Manipulating Text
In the realm of digital artistry, the true magic happens when you can not only add text but also have the finesse to edit and manipulate it, transforming mere words into dynamic visual elements. This is where the artistry of editing and manipulating text in Procreate Pocket comes into play, offering a world of creative possibilities.
Transforming Text
Text transformation is like molding clay—it allows you to reshape and contort your text to create truly unique effects. In Procreate Pocket, the process is straightforward yet incredibly powerful:
Rotation: To rotate text, select the text layer you wish to transform. Then, with two fingers, simply twist and turn the text to the desired angle. This capability is fantastic for creating dynamic and unconventional text placements, adding a sense of movement to your composition.
Skewing: Skewing text involves distorting it along a specific axis, providing a sense of perspective or playfulness. To skew text, select the layer and use the “Edit” menu. From there, choose “Freeform,” which allows you to manipulate the text by dragging its corners. By pulling and pushing the corners, you can achieve unique skewing effects.
Distortion: Sometimes, you may want to create a more abstract or surreal look. Distorting text can achieve this effect. To distort text in Procreate Pocket, use the Liquify tool. With this tool, you can warp, twist, and stretch your text in imaginative ways, turning it into a visually engaging element within your artwork.
Erasing or Deleting Text
The ability to remove text is as crucial as adding it, and Procreate Pocket offers intuitive methods for text removal while ensuring non-destructive editing:
Erasing Text: To erase text from your canvas, select the text layer and choose the eraser tool from the menu. Simply brush over the text you want to remove, and it will vanish, leaving your canvas unblemished.
Non-Destructive Editing: One of the key principles in Procreate Pocket is the use of layers. When you create a separate text layer for your text, it’s akin to painting on a transparent sheet laid over your canvas. This separation allows for non-destructive editing. If you decide to remove or edit the text later, you can do so without affecting the rest of your artwork. This flexibility is invaluable, ensuring you can refine and adjust your text without compromise.
Advanced Text Techniques
In the dynamic world of digital artistry, the ability to employ advanced text techniques sets the stage for truly captivating and intricate creations. Procreate Pocket, with its versatile set of tools, empowers artists to push the boundaries of text manipulation, unleashing a realm of creative possibilities.
Clipping Masks
The concept of using text as a clipping mask is akin to unveiling a new layer of artistic depth. It allows text to serve as a vessel for images or patterns, creating intricate and visually engaging designs that seamlessly blend text and graphics. Here’s a glimpse into this advanced text technique:
Introduction: Clipping masks involve placing text on top of an image or illustration in such a way that the text acts as a mask, revealing only the portions of the image that intersect with the text. This technique can be a powerful tool for creating stunning visual effects.
Creating Intricate Designs: Clipping masks open the door to a world of creative possibilities. Imagine text that weaves through the branches of a tree, revealing a nature-inspired quote within the silhouette of leaves. Or perhaps a love letter intricately interwoven with an image of intertwined hearts. The ability to merge text and visuals in this manner can result in designs that are both aesthetically striking and conceptually rich.
Combining Text and Illustrations
The synergy of text and illustrations is where the magic of storytelling truly unfolds. Procreate Pocket offers a canvas for integrating text seamlessly with drawings or images, allowing artists to convey their messages with finesse:
Integration Ideas: Integrating text with illustrations can take many forms. For instance, in a comic strip, text bubbles can bring characters to life by showcasing their dialogue and emotions. In an infographic, combining text with visual data representations can make complex information easily digestible. For digital art that seeks to convey a narrative, text can become an integral part of the story, providing context and depth.
Creative Projects: Consider projects like digital storytelling, where text and illustrations harmonize to transport the viewer to a different world. Picture a whimsical children’s book brought to life with animated text that dances alongside charming illustrations. Or a webcomic that leverages dynamic text to create an immersive reading experience. Procreate Pocket’s flexibility enables artists to explore these creative frontiers.
Text on a Path
Adding a touch of elegance and creativity to your text is possible with the “text on a path” technique. It allows text to follow a custom path or shape, offering opportunities for visually appealing and dynamic text arrangements:
Custom Paths: To make text follow a custom path, select the text layer and activate the “Edit Text” function. Then, use the “Insert Path” option to draw a path directly on your canvas. Your text will automatically flow along this path, conforming to its shape. This capability is ideal for creating curved text that wraps around objects or flows gracefully across your artwork.
Visual Appeal: Curved and flowing text can add a touch of sophistication to your compositions. Whether you’re designing logos, creating intricate typography art, or crafting unique visual elements, text on a path allows you to infuse your work with a sense of motion and style. It’s a technique that goes beyond static text, making your words an integral part of the visual journey.
In conclusion, advanced text techniques in Procreate Pocket open up a world of creative possibilities. Clipping masks enable the seamless fusion of text and visuals, giving rise to intricate designs. Combining text with illustrations breathes life into storytelling and artistic expression. And text on a path adds a dynamic and elegant dimension to your compositions. These techniques empower artists to convey their messages, stories, and emotions with artistic finesse, elevating their digital artistry to new heights. So, whether you’re crafting compelling digital narratives, designing captivating visual content, or pushing the boundaries of typography, Procreate Pocket equips you with the tools to bring your creative vision to life. Happy crafting!
Exporting and Sharing Text
As your creative journey in Procreate Pocket culminates, the crucial steps of exporting and sharing your text-enhanced artwork become paramount. These final stages determine how your masterpiece will be seen, shared, and appreciated by your audience, making them integral to your digital artistry experience.
Saving Your Work
Before embarking on the path of exporting and sharing, it’s essential to safeguard your artistic endeavors by saving your Procreate Pocket project. This fundamental step ensures that your hard work remains intact for future edits and revisions, preserving your creative vision in its entirety. Here’s how to do it:
Save Your Procreate Pocket Project: To save your work, tap the wrench icon to access the ‘Actions’ menu. From there, select ‘Share’ and then ‘Save .procreate.’ This will create a Procreate-specific file that stores all your layers, text, and settings. Saving in this format retains the flexibility to make adjustments later, a crucial aspect of professional digital artistry.
Importance of Saving Editable Files: Emphasize the critical importance of saving in a format that preserves the ability to edit. In the creative process, ideas evolve, and improvements emerge over time. Saving editable files ensures that you can revisit your project, tweak text, refine details, or adapt it to new purposes without starting from scratch. It’s the essence of future-proofing your digital art.
Exporting Text
Once your work is safely saved, the next step is to export it, making it accessible to a wider audience or suitable for various purposes. Procreate Pocket offers multiple export options, each catering to specific needs:
Detail the Export Process: To export your artwork with text, access the ‘Share’ menu within the ‘Actions’ tab. Here, you’ll find a range of export options. Walk through the steps of selecting the export format that best suits your goals. Explain that Procreate Pocket supports various file types, such as PNG, JPEG, and PSD (Photoshop), catering to different requirements.
File Formats for Different Purposes: Discuss the significance of choosing the right file format. For instance, PNG is ideal for sharing artwork on social media or the web due to its high-quality image and transparency support. On the other hand, PSD preserves layers, making it an excellent choice if you intend to continue working on your project in a more robust design software like Adobe Photoshop. Tailoring the export format to the intended use ensures that your text-enhanced artwork maintains its integrity and visual appeal across platforms and applications.
Troubleshooting

Even the most proficient digital artists may occasionally encounter hurdles when adding text to their creations in Procreate Pocket. However, fear not, for troubleshooting these common issues is an essential skill that ensures a seamless creative process. Here, we’ll delve into some of these potential roadblocks and provide effective solutions and workarounds to keep your artistic flow uninterrupted.
1. Text Not Appearing on Canvas
Issue: You’ve added text, but it’s not showing up on your canvas, leaving you puzzled and frustrated.
Solution: First, check the color of your text. It might be blending in with the background. Adjust the text color to ensure it’s visible. If this isn’t the issue, confirm that the text layer is placed above the background layer in the layer stack. Sometimes, layers can get accidentally rearranged.
2. Text Not Editable
Issue: You want to make changes to your text, but it appears to be locked or uneditable.
Solution: Ensure that you’re on the correct text layer. Procreate Pocket allows you to merge or flatten layers, making text uneditable. If you’ve mistakenly merged the text layer, consider undoing the action to regain editability.
3. Blurry or Pixelated Text
Issue: Your text looks blurry or pixelated, and it’s affecting the overall quality of your artwork.
Solution: This issue typically arises when text is resized beyond its original dimensions. To maintain clarity, always create text at the desired size or vectorize it for scalability. Additionally, check the canvas resolution; higher resolutions result in crisper text.
4. Text Cut Off or Truncated
Issue: Part of your text appears cut off or truncated, disrupting the intended message.
Solution: This problem usually stems from insufficient canvas space. Expand the canvas size or reposition the text to ensure it’s fully visible. You can also experiment with text alignment options to achieve the desired layout.
5. Text Not Following a Path Correctly
Issue: You’re attempting to make text follow a custom path, but it’s not aligning as expected.
Solution: Ensure that the path you’ve drawn is continuous and without gaps. Check if the text layer is set to follow the correct path. Adjust the path’s anchor points if needed, and consider using the ‘Edit Text’ feature to fine-tune the alignment.
6. Fonts Not Displaying Correctly
Issue: The fonts you’ve used in your artwork don’t display correctly when viewed on different devices.
Solution: To ensure consistent font rendering, especially when sharing or exporting your artwork, embed the fonts within your Procreate project. This ensures that the chosen fonts are retained when others view your work on various devices.
7. Text Export Quality Issues
Issue: After exporting your artwork, you notice that the text quality isn’t as expected; it appears jagged or distorted.
Solution: When exporting, opt for formats that support high-quality text rendering, such as PNG or PSD. These formats preserve text clarity and maintain sharp edges. Additionally, export your artwork at a suitable resolution to avoid loss of detail.
Troubleshooting these common text-related issues in Procreate Pocket empowers you to navigate the intricate world of digital artistry with confidence. Remember that artistic challenges are part of the creative journey, and knowing how to overcome them enhances your skills and ensures that your vision materializes seamlessly. As you delve deeper into the world of digital art, these troubleshooting tips will serve as valuable tools in your arsenal, allowing you to unleash your creativity without constraints.
Tips and Tricks
In the realm of digital artistry, mastering the art of text manipulation in Procreate Pocket is akin to unlocking a treasure trove of creative possibilities. While you’ve already embarked on an enriching journey through the various facets of text, there are additional tips and tricks that can elevate your skills and streamline your workflow, ensuring that every stroke of your digital brush serves your artistic vision.
1. The Power of Gestures
Procreate Pocket is designed to be intuitive, and gestures play a significant role in enhancing efficiency. Swipe with two fingers to undo, three fingers to redo, or pinch to resize your text. These gestures can save you valuable time and streamline your creative process.
2. Quick Access to Color
To speed up your color selection process, tap and hold on the color wheel to instantly sample any hue from your canvas. This feature ensures that your text harmonizes seamlessly with your artwork.
3. Precision Alignment
For precise alignment of text, utilize Procreate Pocket’s alignment guides. Simply tap and hold the text layer, and alignment options will appear. These guides assist in aligning your text vertically or horizontally, ensuring a polished and professional look.
4. Clipping Masks for Text Effects
Explore the versatility of clipping masks by applying them to text layers. This technique allows you to create intricate text effects by confining the text to specific areas of your artwork. Experiment with blending modes and opacity to achieve unique and captivating results.
5. Importing Custom Brushes
Custom brushes can be used not only for illustration but also for text. Import custom brushes to add texture or unique effects to your text. This personalization sets your artwork apart and adds a distinctive touch to your typography.
6. Grouping and Organizing Layers
As your projects become more complex, efficient layer management becomes crucial. Group text layers with related elements, such as illustrations or backgrounds, to keep your workspace tidy and navigation smooth.
7. Experiment with Filters
Procreate Pocket offers a range of filters that can be applied to text layers. These filters open up a world of creative possibilities, from adding depth with Gaussian Blur to achieving vintage vibes with Noise. Experimenting with filters can lead to unexpected and captivating text effects.
8. Optimize Canvas Size
Be mindful of your canvas size, as it directly impacts your document’s performance. Larger canvases demand more device resources, so consider the dimensions you truly need for your project to strike the right balance between detail and performance.
9. Explore Tactile Textures
Take advantage of Procreate Pocket’s ability to mimic tactile textures. Experiment with brushes that emulate materials like watercolors, acrylics, or pastels to give your text a physical, touchable quality, enriching your digital artwork with a tactile sensibility.
10. Learn Keyboard Shortcuts
For a more efficient workflow, familiarize yourself with keyboard shortcuts, especially if you’re using Procreate Pocket on an iPad with a keyboard attachment. These shortcuts can significantly speed up tasks like duplicating layers, switching tools, or adjusting opacity.
As you continue your creative journey with Procreate Pocket, integrating these tips and tricks into your workflow will not only enhance your efficiency but also open up new avenues for artistic expression. Remember that the beauty of digital art lies in its endless potential for exploration and innovation. Embrace these techniques as tools to empower your artistic vision, and let your creativity flow unrestricted. Your mastery of text manipulation in Procreate Pocket is a testament to your dedication as a digital artist, and there’s no limit to what you can achieve.
Additional FAQs
- Can I use custom fonts in Procreate Pocket?
Yes, you can use custom fonts in Procreate Pocket. Procreate Pocket offers the flexibility to import and use custom fonts to add a personalized touch to your digital artworks. By installing custom fonts on your device, you can access and utilize them within Procreate Pocket, enabling you to achieve unique and creative typographic effects. Custom fonts empower you to tailor your text to your specific project, enhancing the overall visual impact of your digital art. This feature allows you to seamlessly integrate your preferred fonts, ensuring that your typography complements your artistic vision and stands out in your creations.
- How do I create curved text in Procreate Pocket?
Creating curved text in Procreate Pocket is achievable by following these steps:
Add Your Text: Start by adding the text you want to curve to your canvas using the text tool.
Transform the Text Layer: Once your text is on the canvas, select the text layer in the layer panel. Then, tap the cursor icon at the top of the screen.
Adjust the Bend Option: In the pop-up menu, you’ll find the “Bend” option. Tap on it, and you’ll see a curve slider. Adjust this slider to bend your text to your desired shape.
Edit and Fine-Tune: You can further fine-tune the curve by dragging the points on the curve or using the “Edit Text” option. This allows you to control the curvature precisely.
Apply and Finalize: Once you’re satisfied with the curve, apply the changes. Your text will now follow the chosen path.
This method gives you the freedom to create beautifully curved text that seamlessly integrates with your digital artwork in Procreate Pocket.
- How can I export my Procreate Pocket artwork with text?
Exporting your Procreate Pocket artwork with text is a straightforward process:
Finishing Your Artwork: First, make sure your artwork is complete, including any text you’ve added.
Access Export Options: Tap the wrench icon at the top left to access the Actions menu. Then, select “Share” from the list of options.
Choose File Format: You’ll see a variety of file format options, including PNG, JPEG, PSD, and more. Pick the format that suits your needs. If you want to preserve text editability, consider using PSD.
Set Resolution: Adjust the resolution as per your requirements. Higher resolutions are ideal for printing, while lower resolutions are suitable for online sharing.
Export: Tap “Share Artwork,” and Procreate Pocket will render your artwork with the text and prepare it for export.
Select Destination: Choose where you want to send your artwork, whether it’s to your device’s storage, email, or a cloud service like iCloud or Dropbox.
Confirm Export: Confirm your export settings, and your Procreate Pocket artwork with text will be saved or shared according to your chosen settings.
By following these steps, you can easily export your Procreate Pocket artwork, complete with text, in the format and resolution that best suits your creative intentions.
No Comments